• Home
  • Your Favourites
    • #EatWTiff
    • It's Beauty
    • Here We Go
    • Tweekly
  • Contact

Tiffany Lim


For 4 serving. Time consumed; 30-40minutes

Ingredients: (All can be bought in poon huat- it's halal)
40g of semi-sweet 
(Those that won't harden, if you not sure, ask the auntie, otherwise grab the Poon huat brand)

8 Tbs. unsalted butter – cut into small cubes
6 Tbs. all purpose flour
1/4 tsp. salt
1 cup of icing sugar
1/2 tsp. pure vanilla extract
2 egg – room temperature
2 egg yolk – room temperature
4 custard ramekins – 2 inches deep
Whipped cream and/or ice cream – optional

*Note: is a MUST to use the ceramic ramekins, and not muffin pan.


Directions:
  1. Preheat oven to 215 degrees C and place oven rack in center position.
  2. Grease 2 ramekins with non-stick spray or butter and place on a baking sheet. Set aside.
  3. Place butter and chocolate into a large microwave-safe bowl and microwave on high, until butter and chocolate melt. Whisk to combine. Mixture should be completely melted and very smooth.
  4. Sift the sugar into the melted chocolate mixture, add the salt and whisk together, until smooth and thoroughly combined.
  5. In a small bowl or measuring cup, lightly whisk together the egg(s), egg yolk(s) and vanilla extract.
  6. Gradually whisk the egg mixture into the chocolate. Mix, until thoroughly combined.
  7. Sift the flour into the chocolate mixture and mix gently to combine, just until the flour disappears. Scrape the sides and bottom of the bowl.
  8. Evenly pour the batter into ramekins and bake for about 13-15 minutes, until edges are set and center is soft. Mine were perfect at 13 minutes, but ovens vary. Allow to cool for a minute or two, before handling.
  9. Run a knife or thin metal spatula around the edge of each ramekin to loosen. Holding the ramekin with a dish towel, invert it onto the serving plate. 
  10. Dust cakes with powdered sugar, if desired. And I gotten ice cream home, my sister should be digging only the vanilla, but she scoop all three flavours, but nonetheless, it taste real good !
Please be quick, and eat it within less than 20minutes, otherwise the chocolate will harden and there won't be the lava cake effect ! It's soft on the outside, and rich in chocolate on the inside !


Hi nommies ! Christmas is around the corner and I think that the best is bake Delicious food for your family and friends for this cozy season. And I think that Tokyo Banana might be a good idea for gift too !  

Tokyo Banana is of course a well love dessert that everyone love so damn much, if people who never taste Tokyo Banana before... FLY THERE AND GET IT NOW ! Haahahs, joking~ Maybe you can try this recipe and achieve your own Tokyo Banananannanaannanaan *minion*

Made Tokyo Banana last week, and it turn out quite yummy, just that maybe our sponge cake ( the skin of the Tokyo banana), being stretch too much and it taste quit rough, but nevertheless, it's still great ! 

Credit google
Time: 60min
Number of servings: 8 (cream is for 16 or more)

Necessary Equipment:
9-inch square brownie pan, electric mixer

Ingredients:
For Sponge Cake
* 2 egg
* 50g superfine sugar
* 35g cake flour
* 20g (0.7o) milk (room temperature)

For Banana Custard Cream:
* 100g of banana
* 1 egg
* 1 tbsp. corn starch
* 3 tbsp. granulated sugar
* 150ml milk
* A few drops of vanilla extract

Directions:

For Sponge Cake:

1. Line the brownie pan with waxed paper or parchment paper. Preheat the oven to 180C (350F).
2. Beat eggs and sugar with wire whisk in a metal bowl. Placed it over the pan of hot water and melt the sugar and warm them up to 40C (104F). 
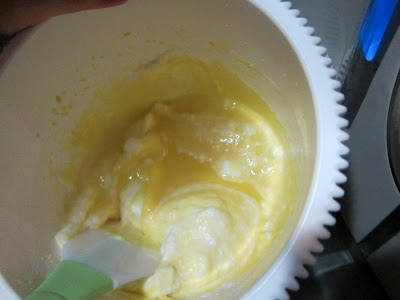
3. Then with an electric mixer, beat the batter on high speed for about 5 minutes until white and fluffy. Then on low speed, beat for about 2 minutes to set the texture.
4. Sift in flour and fold together with spatula for about 10 times.
5. Add milk and fold together with spatula for about 50 times until combined.
6. Spread the batter in the brownie pan and drop the pan lightly on the counter to raise the air bubbles out of the batter.
7. Bake at 180C (350F) for 11-12 minutes till lightly brown. (Depending on the heat of the oven, cooking time may differ, so please watch out.)
8. When it's done, drop the pan lightly to prevent shrinking. Remove the sponge cake from the pan by lifting the wax paper and place it on a wire rack to cool. 
9. When it's cool enough, remove the parchment paper and place the sponge cake on the parchment paper with the brown side up.

For Banana Custard Cream:
1. In a bowl, mash banana with a fork.
2. Add the other required ingredients and mix well. 
3. Strain the mixture through a sieve into a saucepan. 
4. Put on low, stir constantly, and stop the heat when the cream starts to thicken. Mix well with the remaining heat. If you like, add a few drops of vanilla extract. Leave to cool completely.
5. Transfer the cream into a pastry bag OR into a dish covered tightly with plastic wrap (make sure the cream sticks to the plastic wrap to keep from drying out). Chill in the fridge.

Wrap of Tokyo Banana:
1. Cut the sponge cake into 4 squares.
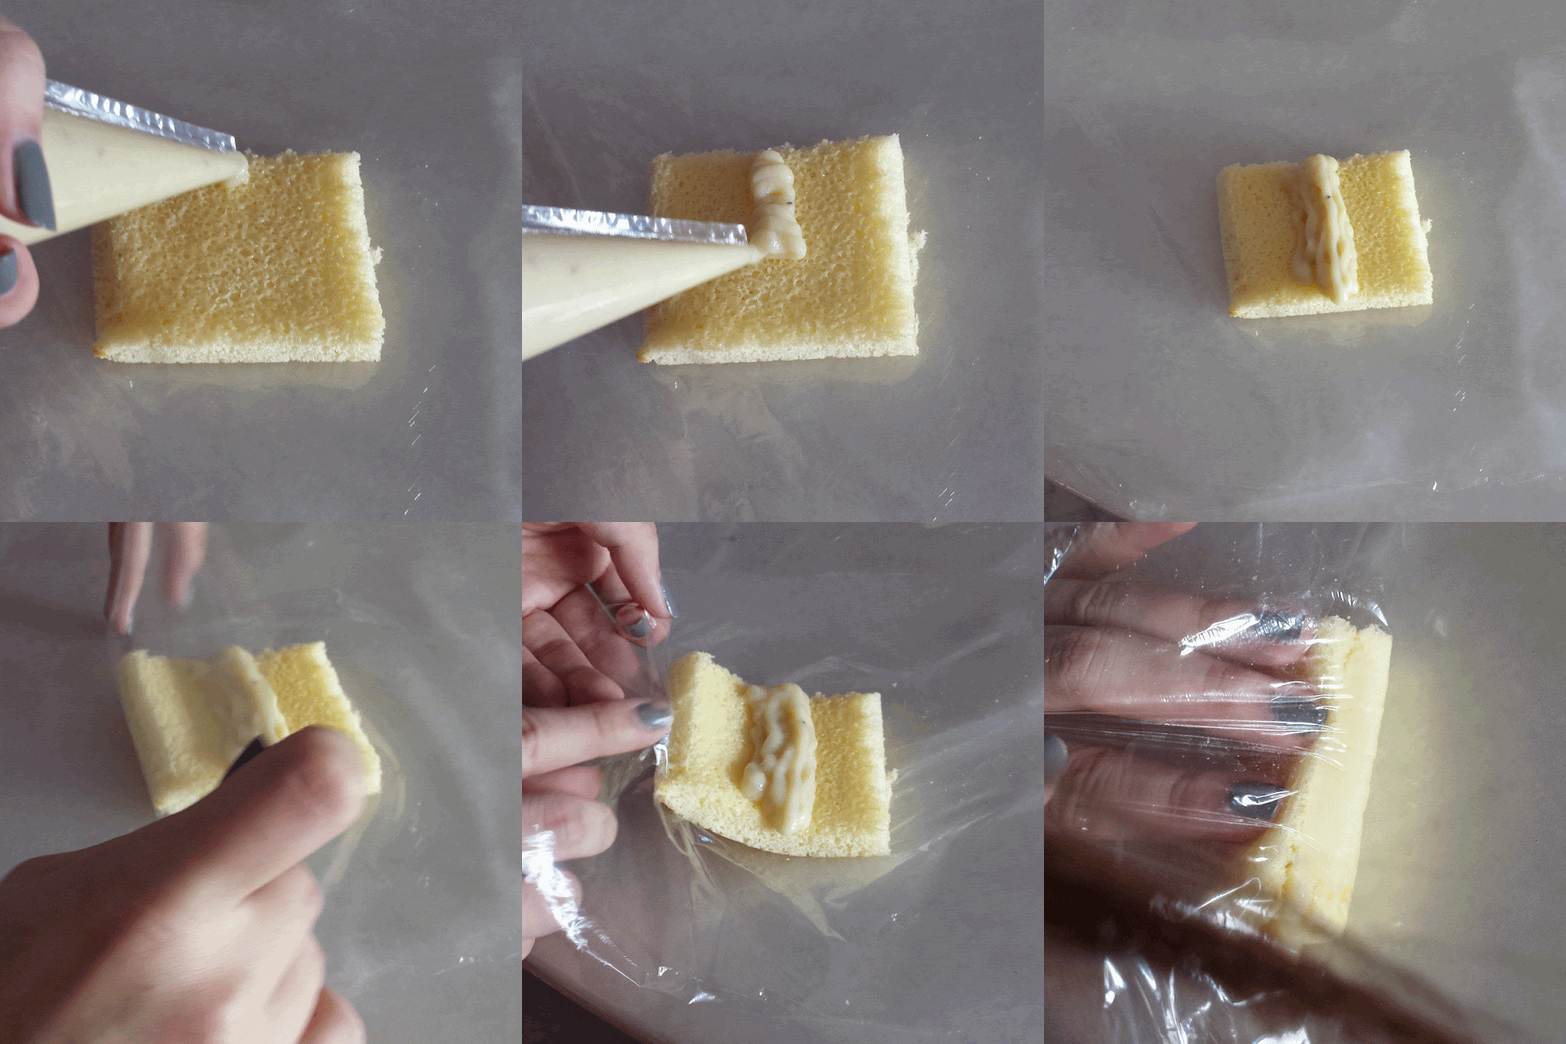
2. Place the cake on plastic wrap (with the brown side up), pipe out the Banana Custard Cream, roll, and securely twist the ends like a candy.

*Note: 
* Try not to pour so many battle, otherwise it will be thick, and trust me, it's not easy to cut the sides
* It will taste better if the square is big enough, otherwise the sponge cake will taste a little rough.
* It tastes good if you chill them in the fridge before you eat.
* You can also use a store-bought sponge cake.

Some Pictures to guide you:

For Sponge Cake


For Banana Custard Cream:


Tata, and yes, it's just sooooo convenience to just eat it in lecture, and sooooo... THERE IS NO PICTURE FOR END PRODUCT EXCEPT THIS BAD TAKEN TOKYO BANANA :'(


P.S/ It's the start of December, ask yourself, did you complete your 2013 new year resolution and who treat you good enough for some handmade food.

Hi nommies ! Not I wanted to crop jacelyn away, but it is to let you all see the cake in the jar ! hahahs ! 
Anyway yes, today's recipe will beeeee~ Chocolate jar in a jar ! 

Ingredients:
1 cup all-purpose flour
1 cup white sugar
1/2 tsp baking soda
1/4 tsp ground cinnamon
1/3 cup butter
1/4 cup water
2 tbsp unsweetened cocoa powder
1/4 cup buttermilk
1 egg, beaten 
1/2 tsp vanilla extract
1/4 cup finely chopped walnuts 
4 small jar ( able to put inside oven)

Directions:

To make buttermilk:
If you don't have buttermilk, you can make one too ! 
1. Half fill the jar with the heavy cream milk. Then screw the lid on firmly
2. start shaking the jar back and forth. After several minutes, the cream will thicken and turn into whipped cream.
3. Keep shaking until the whipped cream is replaced with a yellow glob and a separate liquid (buttermilk)


To make the chocolate cake:
  1.  Sterilize 4 straight sided wide mouth canning jars, lids and rings by boiling for 10minutes. Keep the lids and rings in the hot water until needed. Preheat oven to 165 degrees C
  2. In a small bowl, mix flour, sugar, baking soda and cinnamon. set aside
  3. In a medium saucepan, combine butter, water and cocoa powder. Heat and stir until butter is melted and mixture is well blended. Pour into a large bowl.
  4. Stir in flour mixture and blend. Add buttermilk, egg and vanilla and beat by hand until smooth.
  5. Pour a layer of walnut (about 1.5cm) and then use a piping bag to pour the chocolate mixture into the jar. 
DO NOT OVERFILL THE JAR, JUST HALF WILL DO BECAUSE IT WILL EXPAND AND MIGHT OVERFLOW ! 
That happened to mine ._.

And this small cupcake in the end is the leftover after I place it inside the jar, but if you use 4 jars, there should be no extras, because I only use two jars, and overflow it ._.


Rate: 3.5/5, super easy to bake and pretty to give your friend, quite healthy too, because this is one of the cupcakes that do not require much sugar ! Try it !

This time round, we will make cheesecake that is no need to bake, so if your oven is spoiled or you don't have one, this will be like perfect ! 

Ingredients:
1 cup of Oreo biscuit (without cream)
80ml of butter

500g of cream cheese
2 tsp gelatin
120ml boiling water
180ml castor sugar (about 12 tbsp)
120ml thickening cream

Directions:
To make the base:
1. Just crush your cookies into crumbles and then mix it with the butter. 

To make the cheesecake:
1. Cook the boiling water till it has bubbles, then pour in the gelatin, and make sure your stir well.
2. Blend the cream cheese, sugar and thickening cream together
3. When they are mixed together, add in the gelatin solution and let it blend till it's smooth.

You can also play with colours, and add 1/4 tsp of colouring and mix. For this, we mixing with 2 cup of cheesecake.

And if you do it in a jar, the cheesecake might be way too cheesy, so for my pink colour, it is actually strawberry flavour ! So when eating the cheesecake, there is also strawberry flavour ! cool or what~ haahsh


We had it in a jar, and first you must press the base of the oreo cookies to a flat base first. And use pipping bag, or cheapo, plastic bag to pour your colouring in ! It's better to pour to the center and use a spoon to spread, otherwise use the bag from the corner to the center !


Lastly, place it inside your fridge for at least 8 hours and you can nom it down your tummy already ! Simply and easy ! 

Rate: 3.5/5 because it's super easy to do and you don't have to scare it will overbake ! And it's taste acceptable nice !


Thanks to my cousin, who gotten this recipe from kaykay's blog, which end up we baked this. Okay, I have to admit, I did nothing much.. hehes.

So the ingredients check list ! 

For the crust:
15 Digestives crackers, crumbed
125g of melted butter (to make the cream cheese frosting too !)

3 tbs of sugar

For the batter:
4 egg whites and 2 tbs of sugar
1 tsp baking powder
0.5 tsp of sea salt
1.5 cups all-purpose flour
1 cup sugar
1 tsp vanilla extract
0.5 cup sour cream
2 cups fresh strawberries, hulled and diced


For the cream cheese frosting:
250g cream cheese
125g of butter ( Used the leftovers from the crust
300g of confectioner’s sugar
1 tsp vanilla extract


Preheat oven to 170 degrees Celsius.

For the crust:


This is my way of smashing those diet biscuits ! Clever right~ Instead of using a spoon and making it into powder form. After which, melt your melted butter, just 5 teaspoon will do, and add sugar. After mixing it, it should look like this colour.

I used the 1/4 cup of measuring cup to press it down ! hahahs ! Otherwise, use a spoon ! And bake for 3-5 mins !


For the batter:

Beat the 4 egg whites and 2 tbs of sugar till stiff. It should stay in the mixing bowl even you put it over your head ! Try not to over beat it, but actually I don't really know how it looks like when it is over beaten. Haha~


Then, mix the all-purpose flour, baking powder and salt salt. Set aside.
In another bowl, cream the butter and sugar until light and fluffy, then add the vanilla and beat with a hand mixer.  Then add half the flour mixture until incorporated then mix in the sour cream.  Add remaining flour and mix everything.
Gently fold 1/3 of the egg into the batter until combined, don’t over mix the egg whites or the cupcakes will fall flat. Add remaining egg whites.
Then dice them up and fold into your cupcake batter.
Fill each cupcake about 3/4  and bake for about 20-25 minutes depending on your oven. I baked for 20minutes , and tata~ IT LOOKS NICE RIGHT ;)

For the cream cheese frosting:
Beat the cream cheese, butter and vanilla extract together. Add the confectioner’s sugar a bit at a time. Then beat till light and fluffy. Chill in fridge for an hour. And then you can start decorating your cupcakes! I added a thin slice of strawberry ! 
Also, Recently I learned from RachellTan's blog, that if you want pretty pretty forsting, do it at a 90 degree instead of 45 ! Mine is 45 degree but the strawberry cover 90% of it ! Kekekes ! 

Hope you enjoy baking and loooooooove the strawberry cheesecake cupcake ! hehehes ! 
P.S/ Do tell me the results ! 


Made Cupcake for joyceey's birthday and I didn't took any picture but I have my own modified recipe, because I wanted to bake 12 cupcakes at a go instead of 6, and I didn't just double up the ingredient used. I did some mistake, but it still taste nice (Y) ! Not only what I say okay ! hahahs ! Leggo~

Ingredient for the cupcakes:
3 cups of all purpose flour
3 teaspoons of baking powder
1 teaspoon of salt
1 cup of unsalted butter (I just use all the unsalted butter in the packaging of "star") at room temperature
1 1/2 cup of granulated sugar
3 large eggs, at room temperature
2 teaspoon of vanilla extract
1 cup of normal milk (if you want, you can put strawberry-flavored milk as it goes well with the strawberry theme, but I don't like strawberry milk X.X) hahas

For butter cream icing or frosting
2 cups of icing sugar
1 cup of unsalted butter
12 strawberries
1 teaspoon of coloring or vanilla extract
1/2 up of heavy cream
(if you want to have a chocolate flavored frosting, try adding 1/2 cup of unsweetened cocoa powder)


Directions

Making the cup cakes:
1) preheat the oven to 350 degrees F. Line a 12-cup jumbo muffin pan with paper liners.
2) Whisk the flour, baking powder and salt in a bowl.
3) Beat the butter and granulated sugar in a large bowl with a mixer until light and fluffy, about 3 minutes. Beat in the eggs, one at a time, then beat in the vanilla.
4) Reduce the speed of the mixer, beat in the flour mixture in 3 batches, added the first two batches of the flour first, then add in the milk, and end with the last batch of flour mixture, until it's combined together.
5)Divide the batter evenly among the prepared muffin cups. Bake for 25 to 30 minutes; 175 degrees. To ensure the cupcakes are fully baked, use a toothpick pop it through, the toothpick should comes out clean. Let cool 5 minutes in the pan, then remove to a rack to cool completely.
6) Using a small knife, cut a cone-shaped piece of cake out of the top of each cupcake in the middle. Then stuff with the strawberries, try to use the small and thin ones. Then cover with a small piece of the removed cake. [ the leftovers, don't waste it and put inside your mouth :O ]

Making the frosting:

1) Separate the icing sugar, cream into two bowl.
2) Sift half of the icing sugar with unsalted butter, and 1.4 cup cream and beat with a mixer on medium-high speed until sooth.
3) Add the remaining sugar and 1/4 cup cream and the food coloring or vanilla extract, beat until fluffy.
4) Transfer to a pastry bag fitted with a star tip and pipe onto the cupcakes.

Note: The frosting should be hard instead of soft, if it's too soft, add more icing sugar.

P.S/ Good luck for some yummy cupcakes !
Ingredient used:

Set A:
3 egg yolks
1/8 tsp salt
24g corn oil
24g milk
1/2 tsp vanilla extract
32g all purpose flour
1/8 tsp baking powder (sift together with the flour)


Set B:
 3 egg white
1/4 tsp cream of tartar
 50g caster sugar

For cream:
90g chilled fresh milk
30g custard powder
1/2 tsp vanilla bean paste or extract
3/4 tbsp icing sugar (optional)
145g dairy whipping cream
One bubble tea straws
Some icing powder (optional)

Set A


Set B

 I totally forget to take picture of Set C, but you all should know right~


Method:
1) Preheat oven to 175℃。
2) In a bowl, whisk egg yolks with salt. Then add oil, milk and vanilla extract, whisk till well-blended.
3) Fold in flour mixture and set aside.
4) In another bowl, beat egg whites , sugar and cream of tartar to stiff peak.
5) Scoop 1/3 of the egg white mixture to the yolk batter, fold well, then pour batter back to the remaining egg whites. Fold lightly till well-mixed.
6) Fill baking cases with about 30-32g of batter. Bake for 20 mins, then leave to cool.

For cream:
7) In a separate bowl, mix milk, instant custard powder, vanilla paste and icing sugar till mixture is smooth.
8) Pour in whipping cream and beat till the thickness desired.
9) Using a piping tip, insert tip into the cake and pipe for 5 seconds. 3 to 4 seconds if you prefer less cream.
10) Sieve snow powder on top (optional) and chill cake before serving


Picture for method 2


 Method 3:

Method 4
 Method 5


It's better to place chiffon opposite so that it won't cool down.

Pretty right~~

 Then use the bubble tea straw to pop the middle of the chiffon to fill the cream inside !

 And use icing sugar to do some decoration !


Tata, and you are donee~~~~ Easy right !

P.S/ some yummy chiffon for you? Teehee.
This is my end product of my churros which I call it the english style of you tiao ! 

Ingredients:

To make Churros:                                                         For the outer coating of Churros:            
1 cup of All purpose flour                                             1/2 cup of granulated sugar                                           
3 tablespoon of unsalted butter                                     1 teaspoon of ground cinnamon
2 tablespoon of vegetable oil                                         
2 eggs
1/2 tea spoon of salt                                                     Optional:
1 teaspoon of vanilla extract                                         1 bowl of dark/ light chocolate

1 cup of water
1 tablespoon of granulated sugar

Oil for deep frying


1. Pour the water, sugar salt, vegetable oil then butter into the pot.
   Fire, medium.


2. After the butter melted, pour the flour in and stir it continuously, till it looks like a dough.

3. Transfer it to a bowl then press it to cool it down.
Lazy people spoil their fridge and put it inside for 3 minutes.
*Note: have to cool the dough down before the egg can be place in otherwise you will have scramble eggs !

5. place the eggs into a bowl and slowly one by one throw it into the mixture.
(ONLY 2 EGGS NEEDED ! ) 
Because ours become way too watery and our Churros is not soild enough to be nice looking ._.

6. use a beater to mix the dough well, and it should be a little solid before another egg is mixed with the dough.

7. place it inside a piping bag

8. Squeeze the dough out into the oil ! Make sure there is enough oil !
*Note: take it out before it's become dark. Because when it's brown, after a while, it will become darker colour.
Not racist ! It's like from Chinese, become Malay, Malay become Indians.

 For the outer coating of Churros:

Just mixed the sugar and cinnamon powder together. And place your Churros into the plate and the sugar will stick on the churros.

For additional:


Place some dark or white chocolate into a small bowl then put inside microwave for about 3minutes, don't make it burn ! It's better to be undercook than overcook. Then you can dip it with the churros !

If you want to be creative maybe maple syrup or nutella !

P.S/ Pastry is to be creative :}
Older Posts Home

ABOUT AUTHOR


I'm Tiffany, and friends call me "Tiff"! A space for the lazy queen, while not living in a mess. Oh, and did I mentioned that I spend 95% of my money on food?
Powered by Blogger.

Instagram

Video Bar

Fresh from IG

Copyright © 2015 Tiffany Lim. Designed by OddThemes | Distributed By Gooyaabi Templates